Image maps
FreeWeb & mobile
Updated · September 2026
Some things you don't memorize as sentences — you memorize where they are. An image map takes a diagram (a cell, a skeleton, a circuit) and pins labeled hotspots onto it, so instead of reading "the mitochondria is the powerhouse," you point at the mitochondria. If you've used image occlusion in other flashcard apps, this is Mento's version of it — built in, no add-ons. This guide covers creating a map, adding hotspots by hand or with AI detection, the two ways to quiz yourself on one, and sharing.
An image map lives inside a topic
An image map is a section type, so it sits in a topic alongside your normal sections. Every hotspot on the image is a regular card: the label is the card's idea, and the explanation is its answer. Tag it, move it, open it to add notes — everything you know about cards applies.
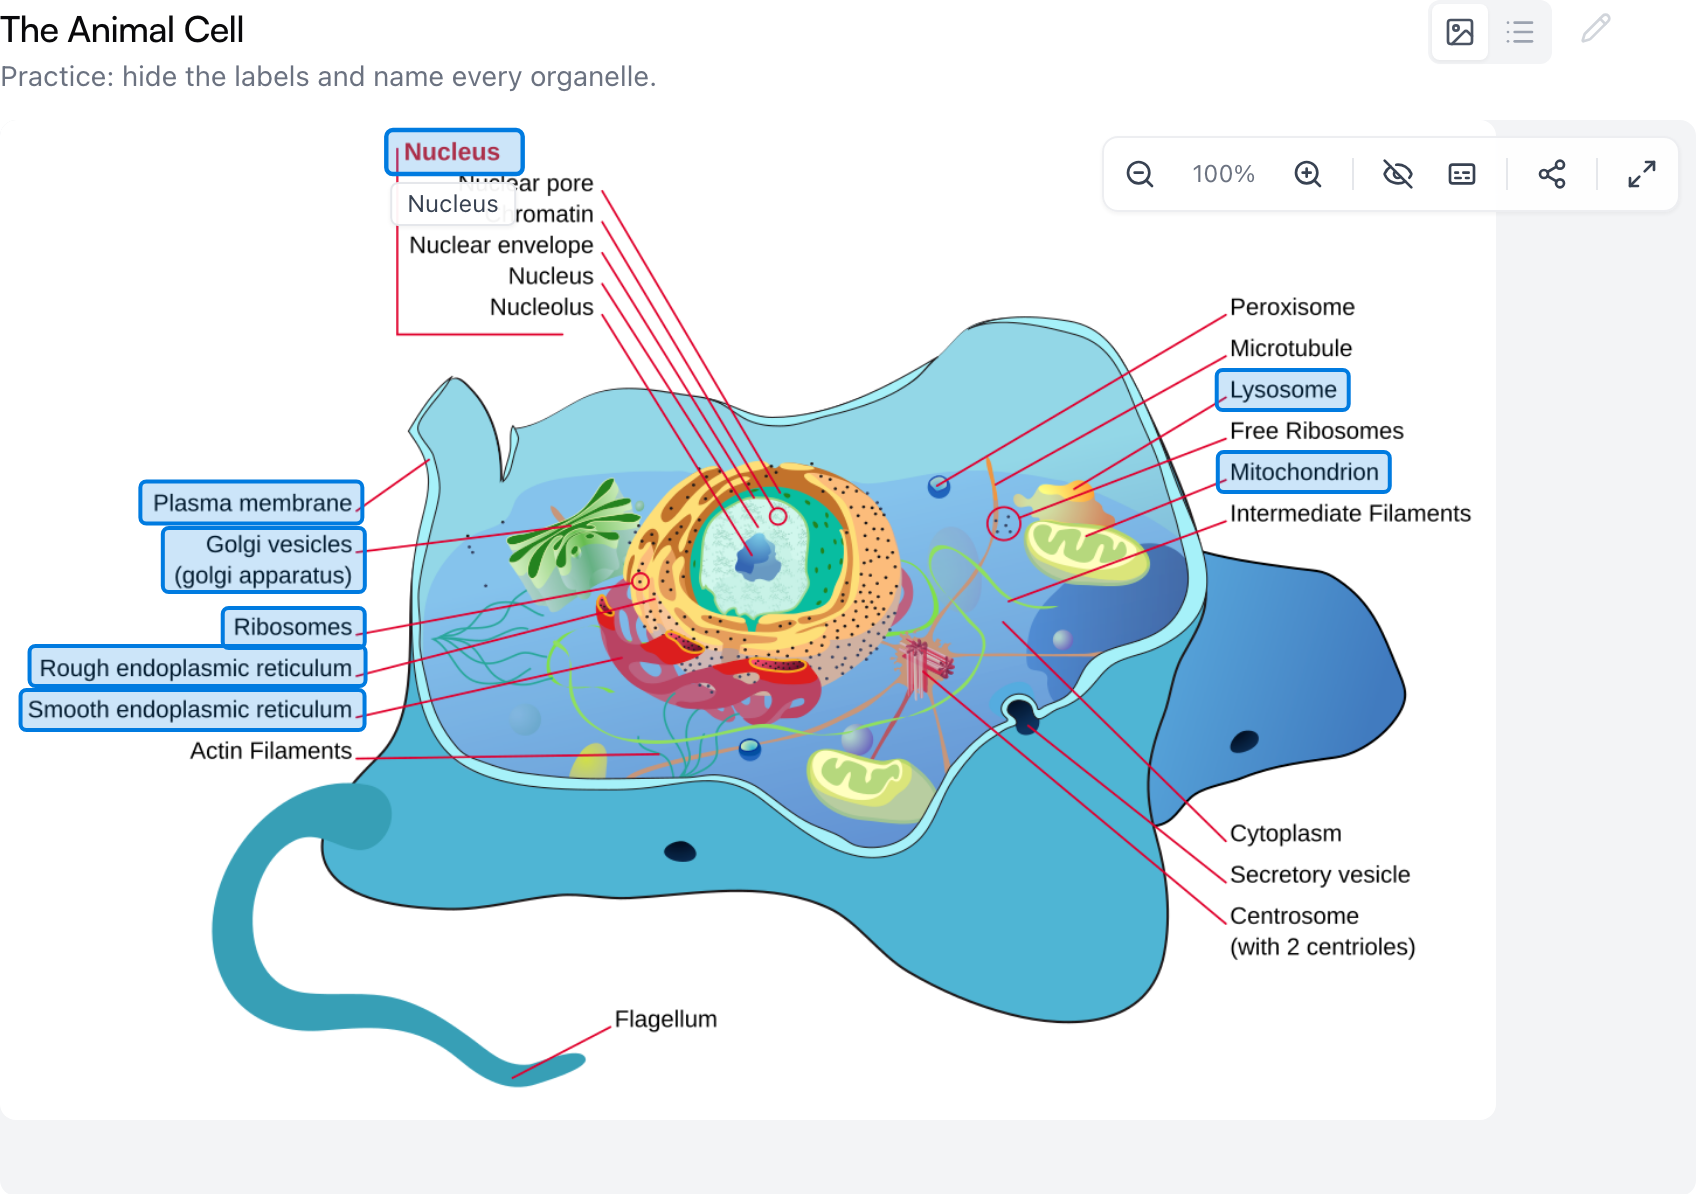
On the topic page the section shows the image with its hotspots outlined on top. Labels stay out of the way until you ask for them: hover a hotspot to see its label — like the Nucleus above — or click it to pop open the card underneath. The toolbar in the corner zooms (you can drag to pan while zoomed), starts practice mode, pins all labels on at once, copies a share link, and expands the map to fullscreen. The buttons in the section header switch between Image map view and List view — the same cards as a plain list — and the pencil opens the hotspot editor.
Create one
There are two doors into a new image map, both on the topic page:
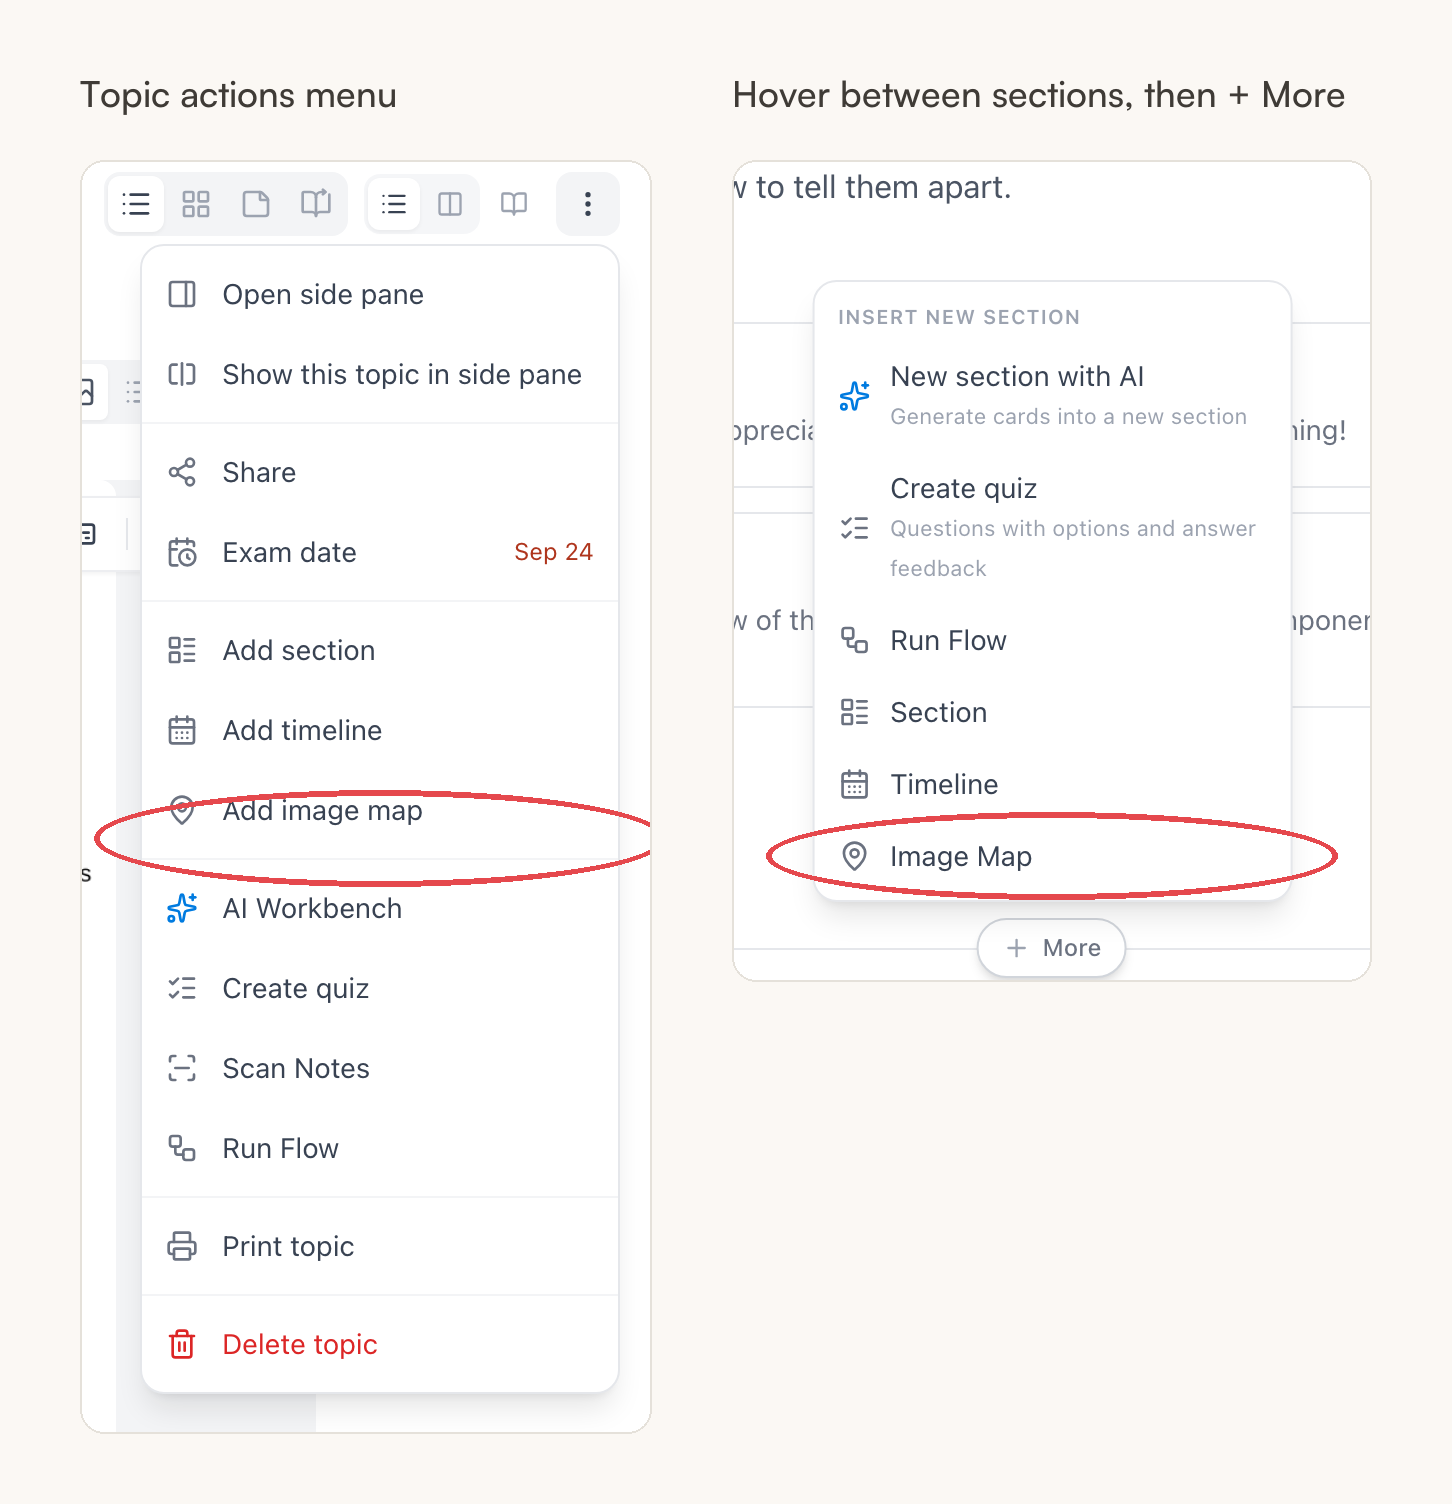
- Open the topic's ⋯ menu and choose Add image map — or hover the gap between two sections, click the + More button that appears, and pick Image Map under Insert new section.
- In the Create Image Map dialog, upload the image — click to browse or drag and drop; PNG, JPG, GIF, or WebP up to 10 MB.
- The title is optional: leave it blank and AI detection can later name the map from the image. Add description is optional too.
- Click Create Image Map.
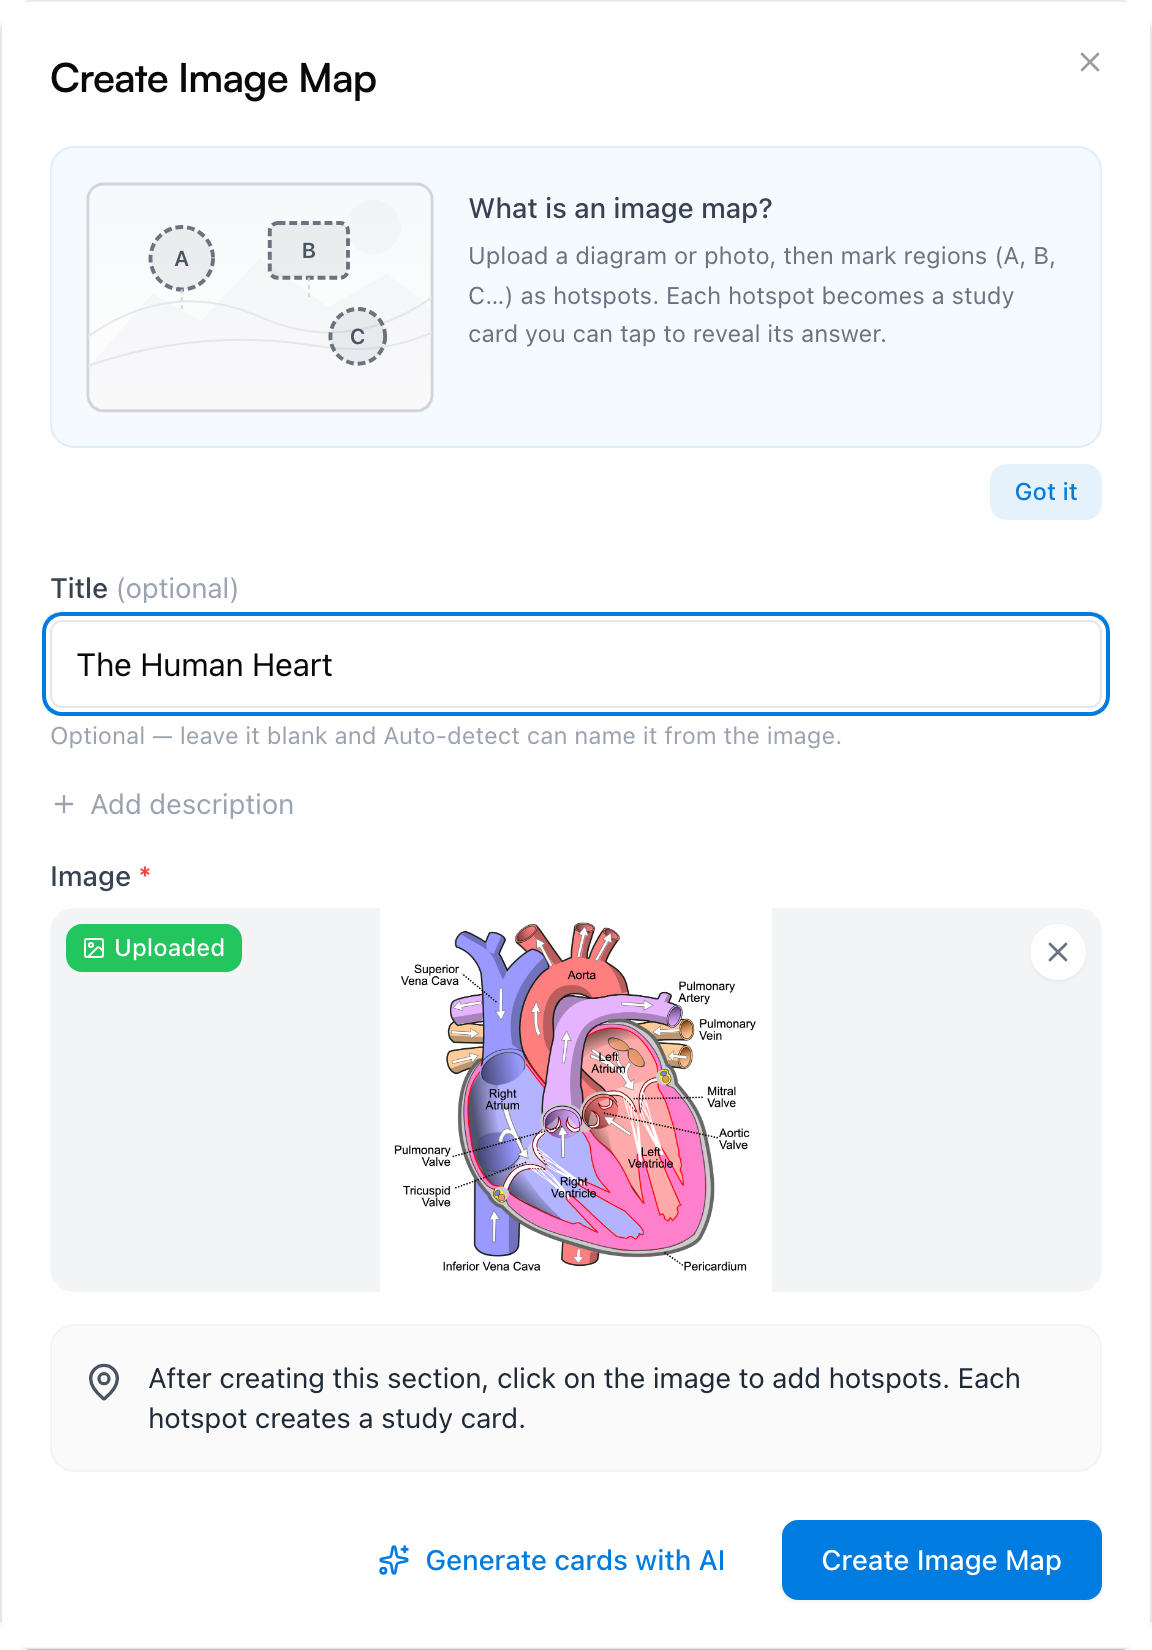
That gives you the map with no hotspots yet. From here you can place them yourself in the editor, or let AI do a first pass — both below.
Tip: The dialog's other button, Generate cards with AI, creates the section and hands the image to the AI workbench, which writes hotspot cards for you in one go. Their positions land as approximate, so expect the repositioning pass described below.
Add hotspots by hand
Open the editor with the pencil button (Edit image map hotspots). Three tools sit in the toolbar under Add:, and the editor's subtitle tells you what to do with whichever one is active:
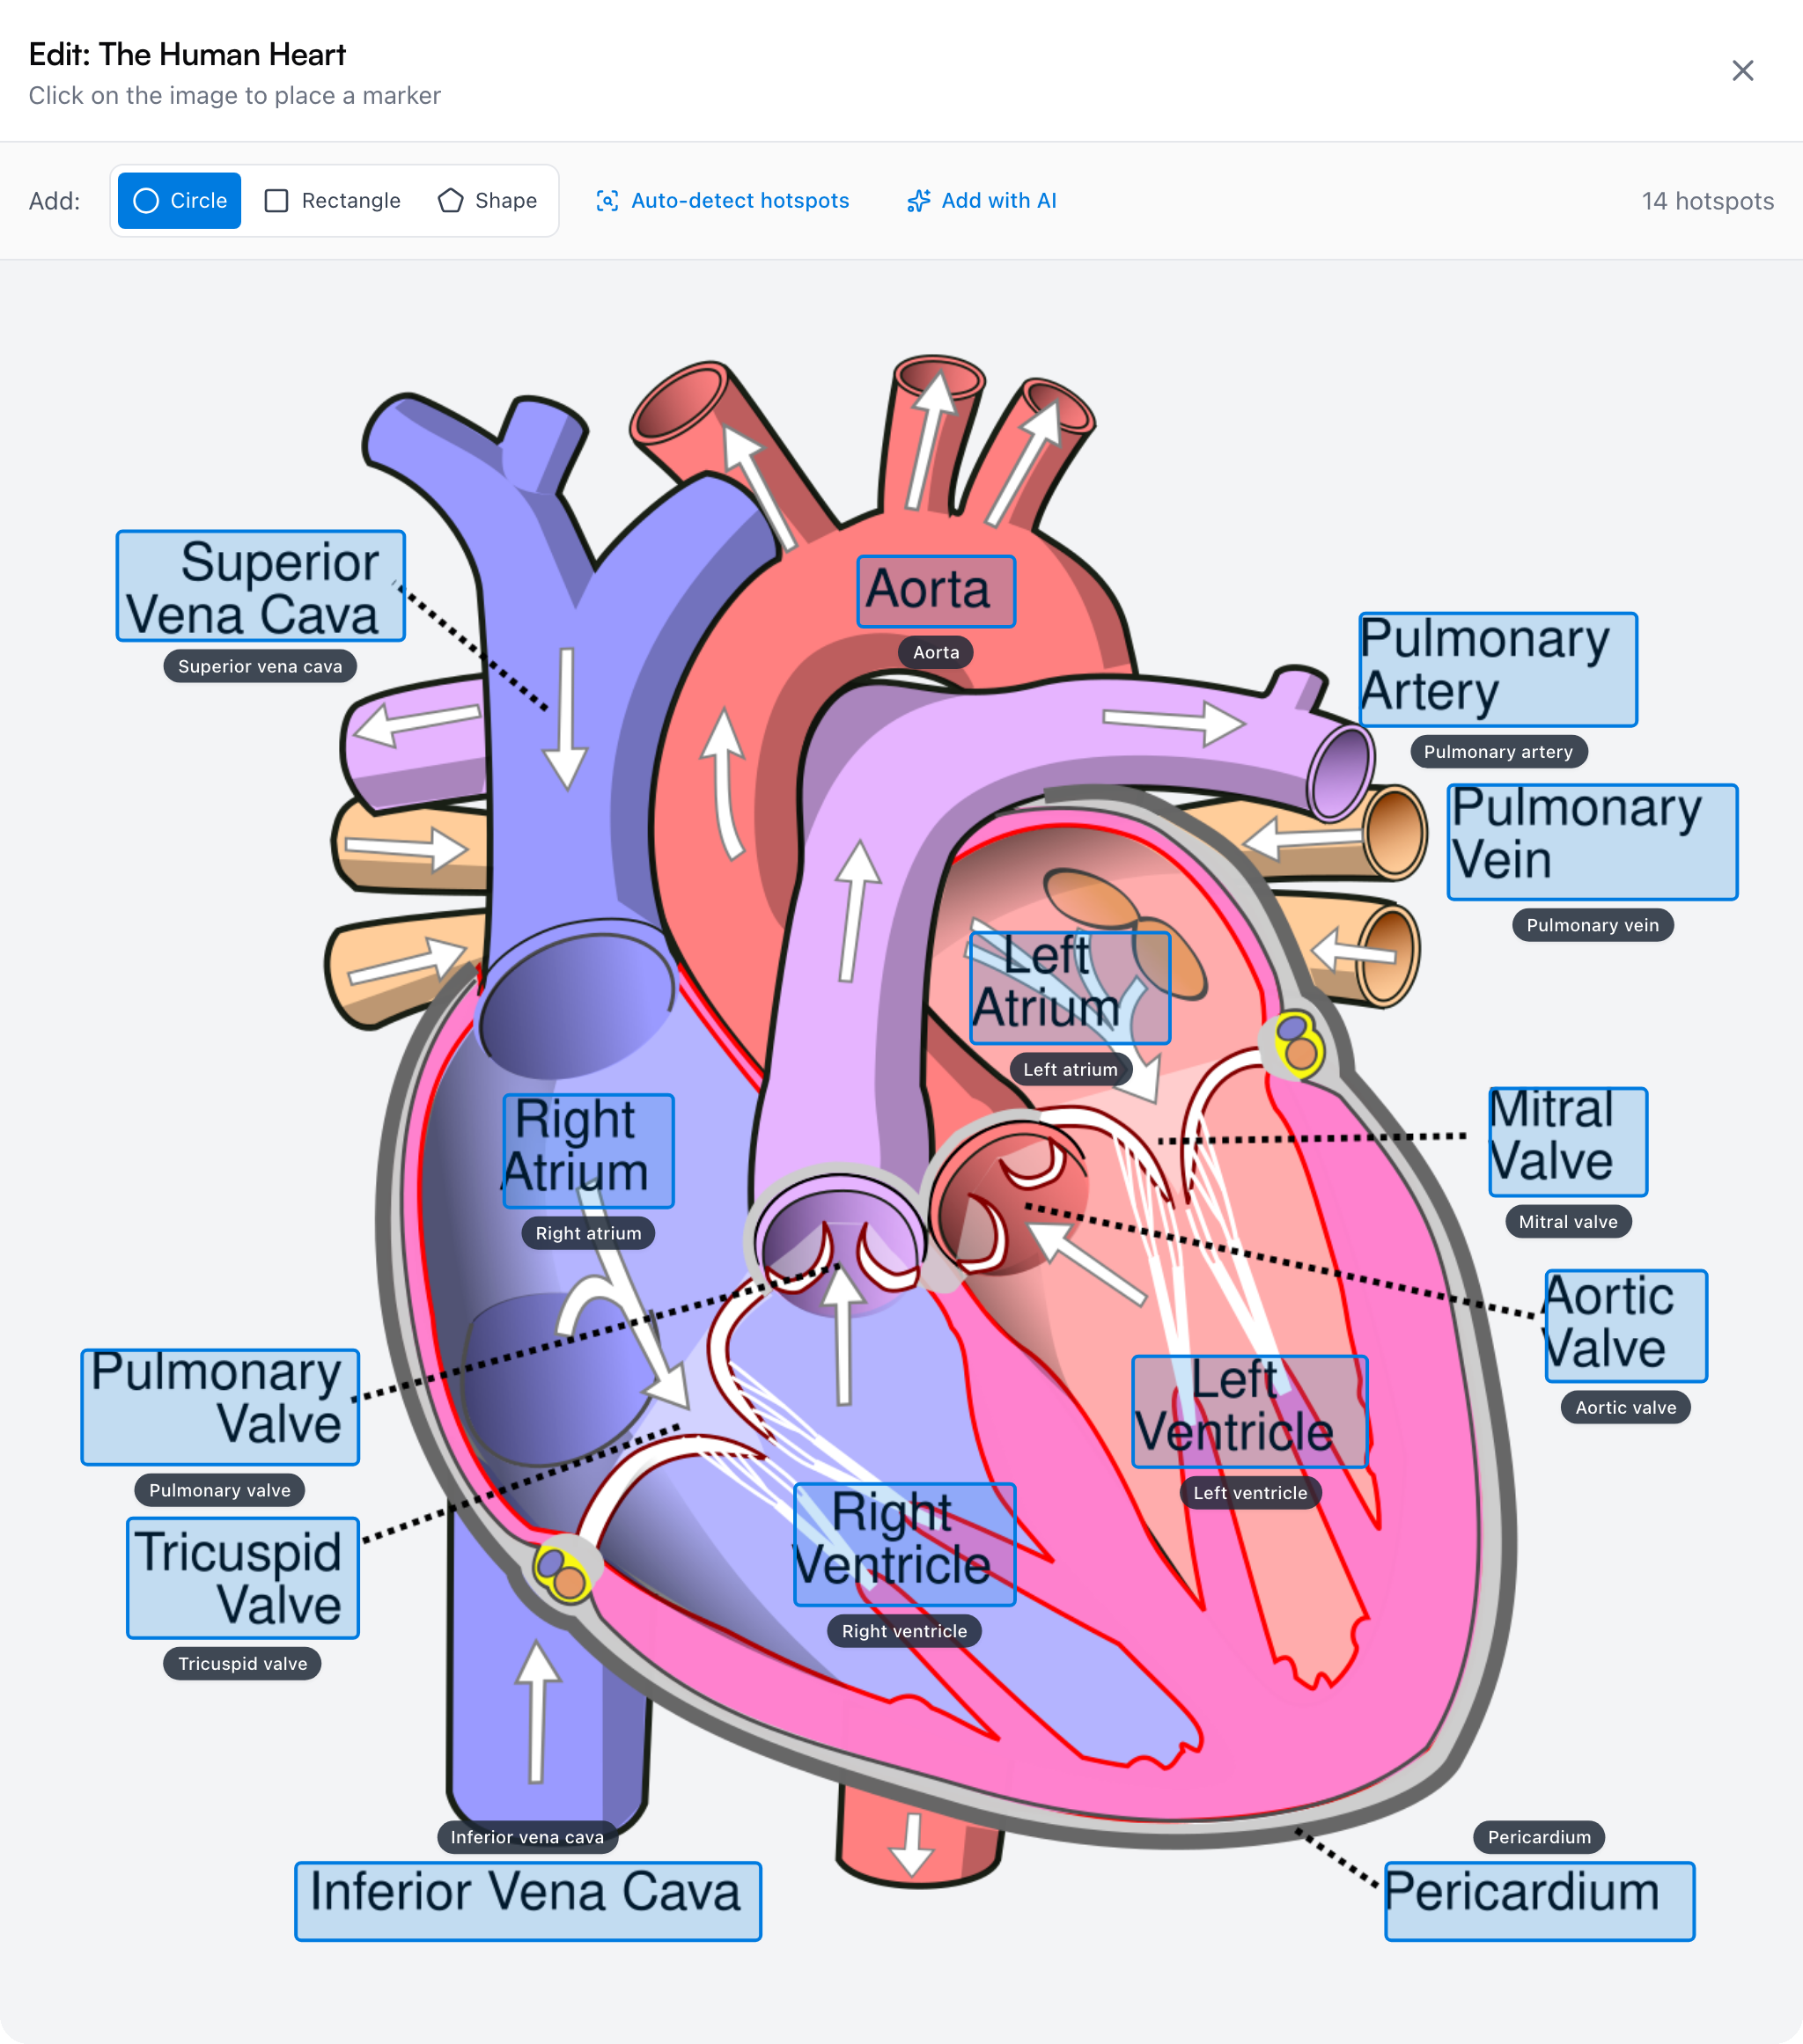
- Circle — click the image to drop a round marker.
- Rectangle — click and drag to cover a region, like a printed label you want to hide in practice.
- Shape — click point by point around an irregular region, then click the first point to close it.
Placing a shape opens a small form right on the image: what this area is (that becomes the card's idea) and an optional description or explanation (the answer). Create saves it — and that's a new card in the section.
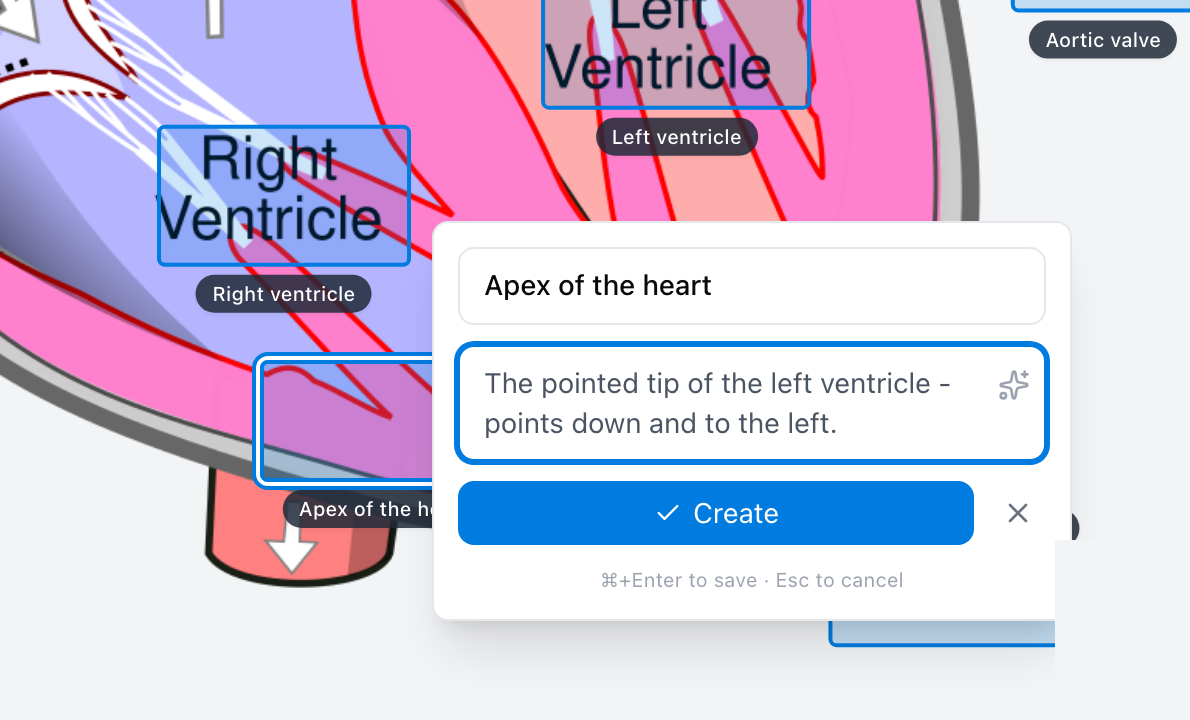
Everything is adjustable afterwards: drag a hotspot to move it, drag a rectangle's corner or a circle's edge to resize it, and click one to rename it, change its shape, or delete it. Deleting a hotspot deletes its card too.
Let AI find the labels
Auto-detect hotspots in the editor toolbar sends the image to AI, which reads the printed labels and creates a hotspot card for each one — up to 15 in one pass, placed over the label text. If you left the section title blank, detection also names the map for you.
Detected hotspots that land slightly off show in amber, with a banner counting how many still need repositioning. Drag each one to the right spot, or click Accept all if they look correct. The Add with AI button next to it opens the AI workbench instead, which is better when you want cards written to an instruction rather than read off the image — the section's ⋯ menu offers the same thing as Add cards with AI.
Image maps are free on every plan; only the AI detection and generation buttons use AI actions from your budget. Drawing hotspots by hand never does.
Practice on the map
There are two ways to get quizzed on a map. The first lives right on the topic page: the eye button in the viewer toolbar (Practice: hide labels) flips the map into a self-test.
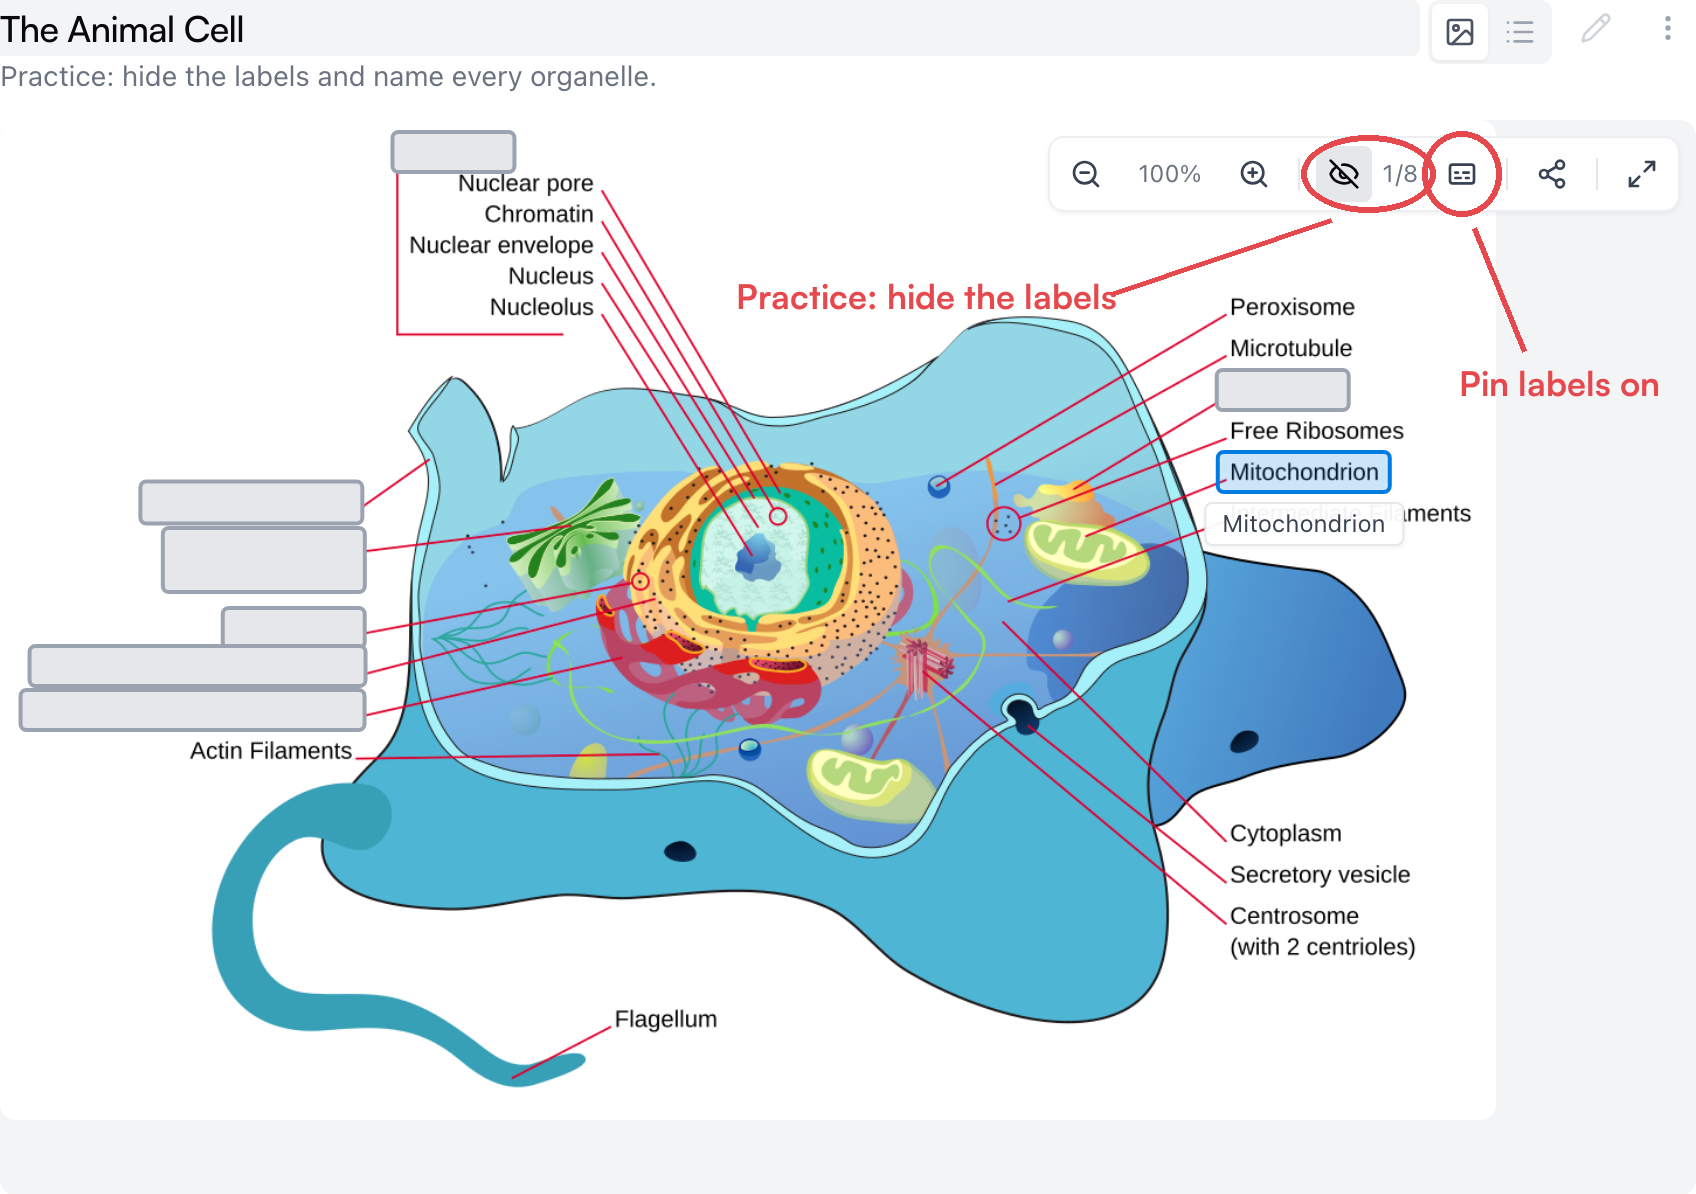
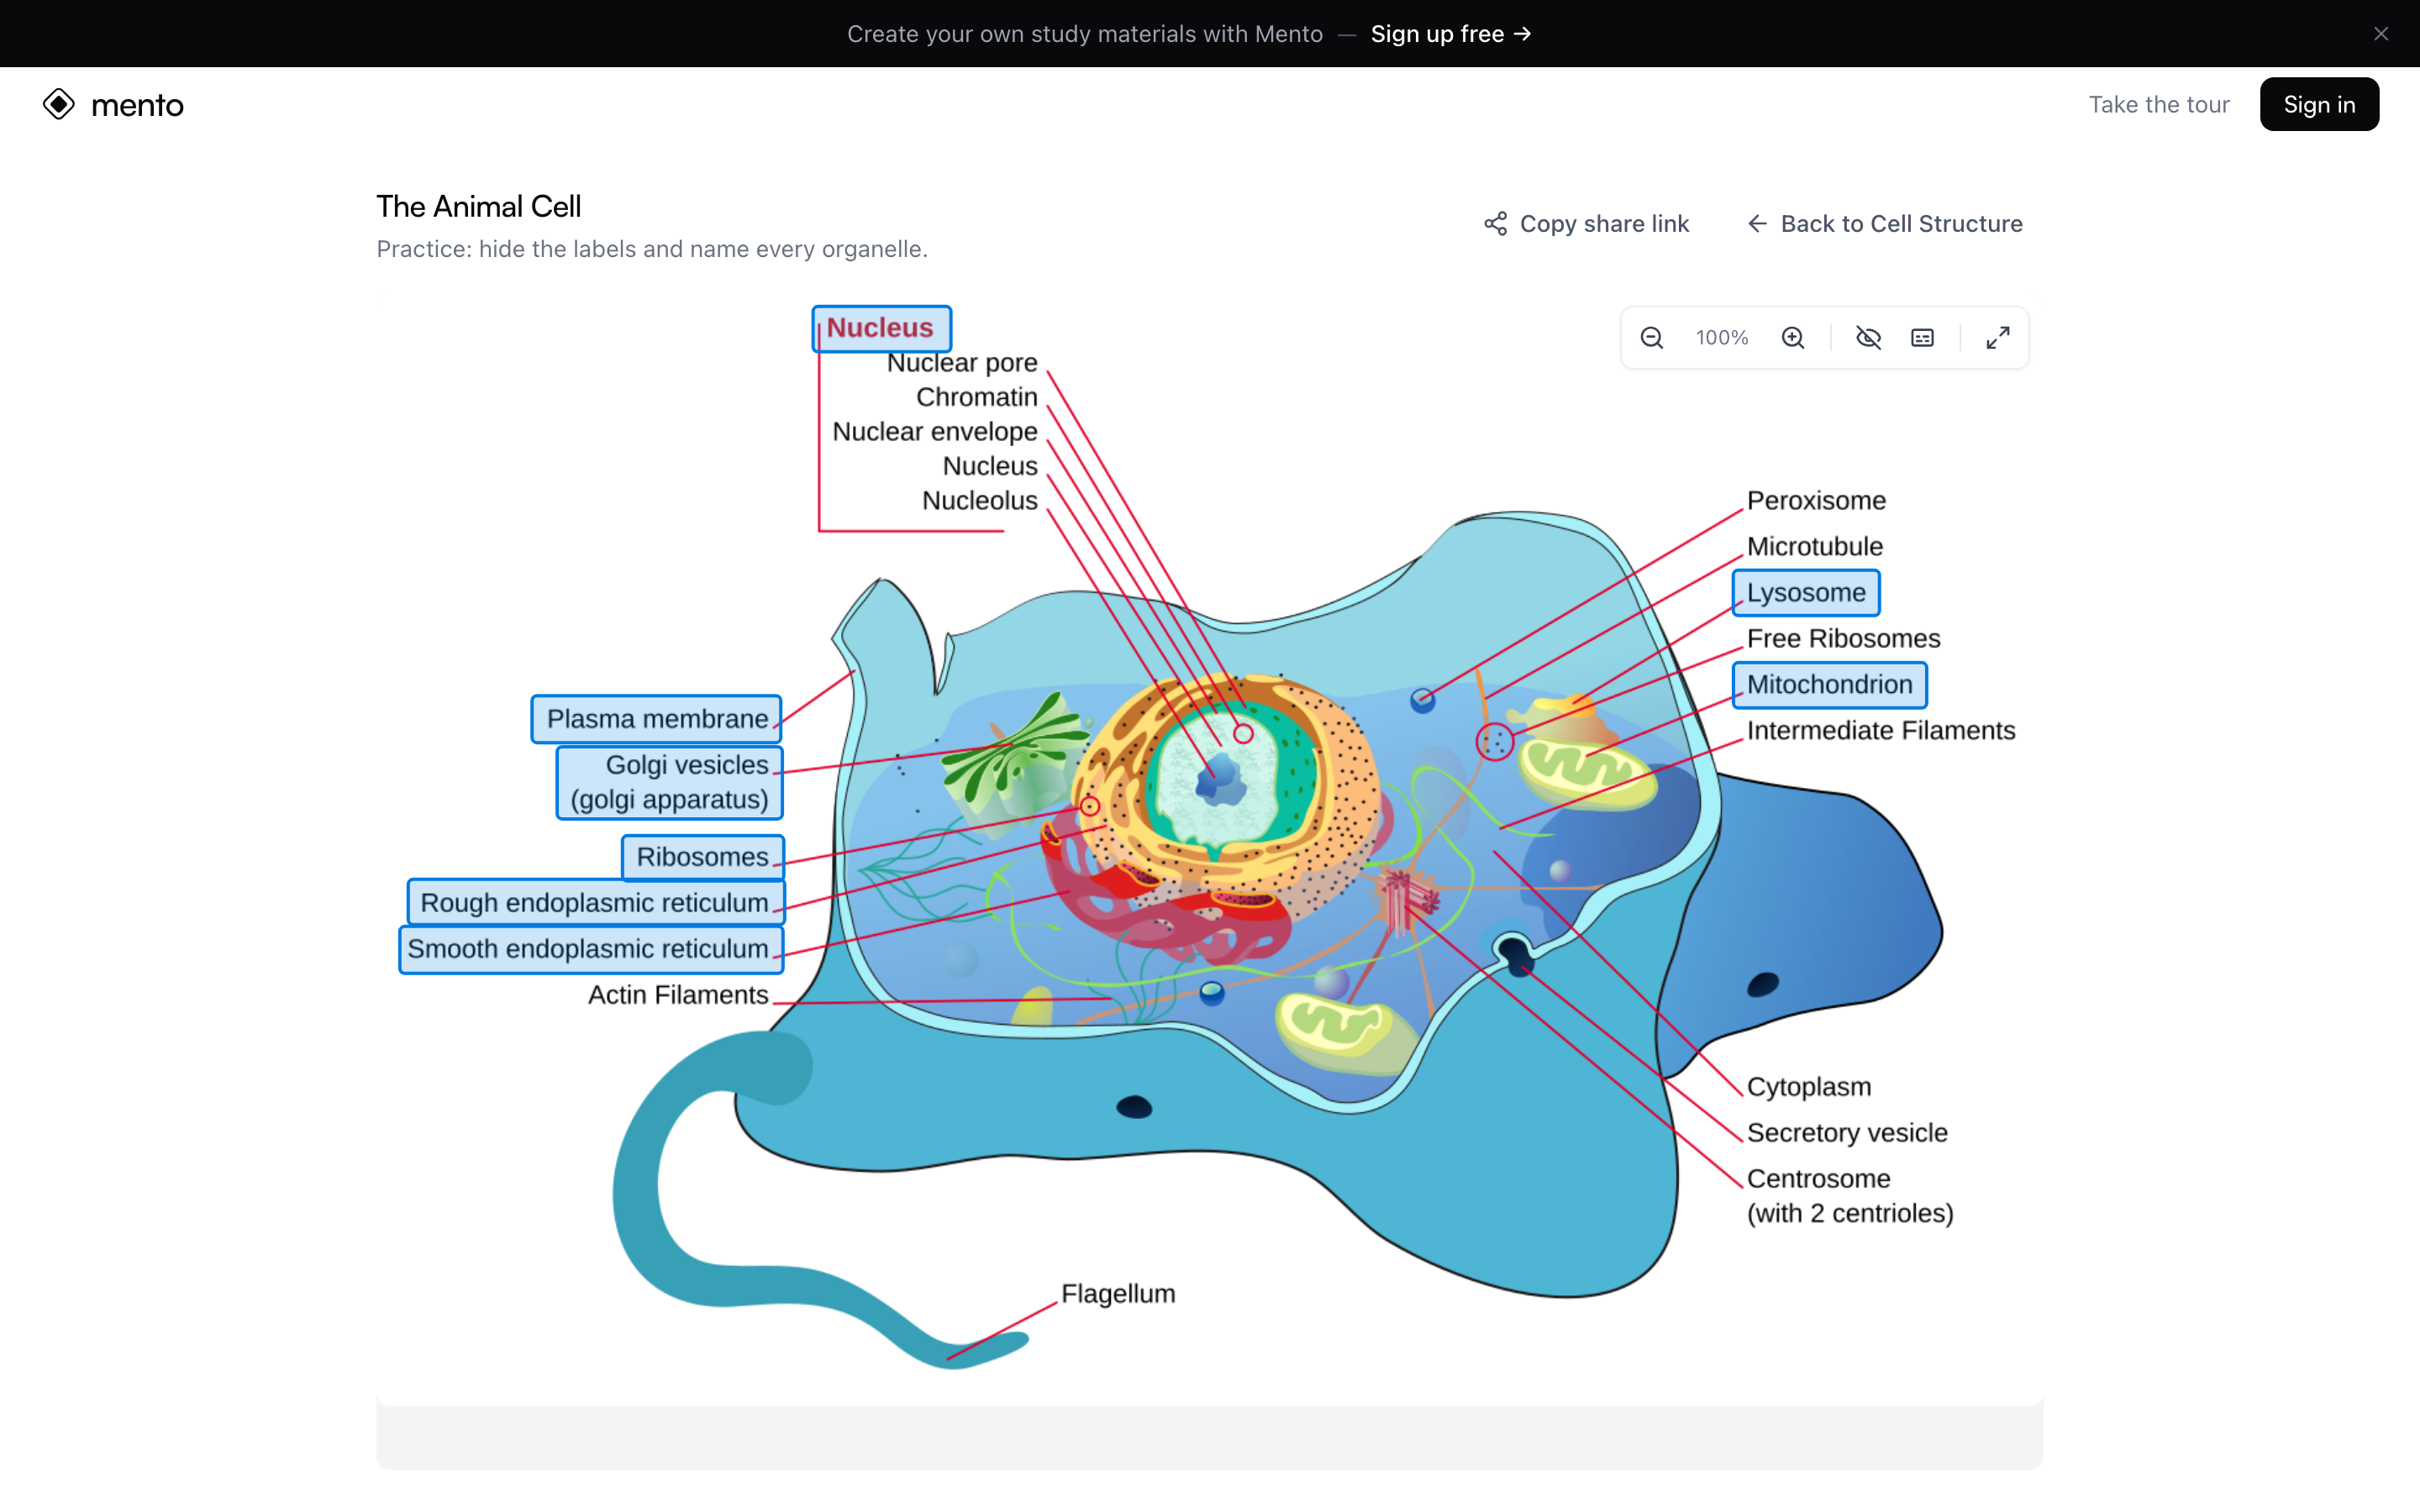
Every hotspot becomes an opaque mask, and you name what's underneath before clicking to reveal it — the counter next to the eye tracks how many you've uncovered. The button next to it pins all labels on when you want to switch back to review. Nothing is recorded — it's a quick warm-up you can run anytime, including in fullscreen, and it works for anyone viewing a map you've shared.
Study with image occlusion
The second way is a real study session, where hotspot cards join flashcards, multiple choice, and written questions like any other cards — start one from the section's ⋯ menu with Study section, or study the whole topic (see How to study). By default the map appears with the asked-about region highlighted and the rest dimmed, so the question is really "what is this part?"
For the full Anki-style image occlusion experience, open the session's Options and turn on Image occlusion — the toggle appears whenever the session includes hotspot cards:
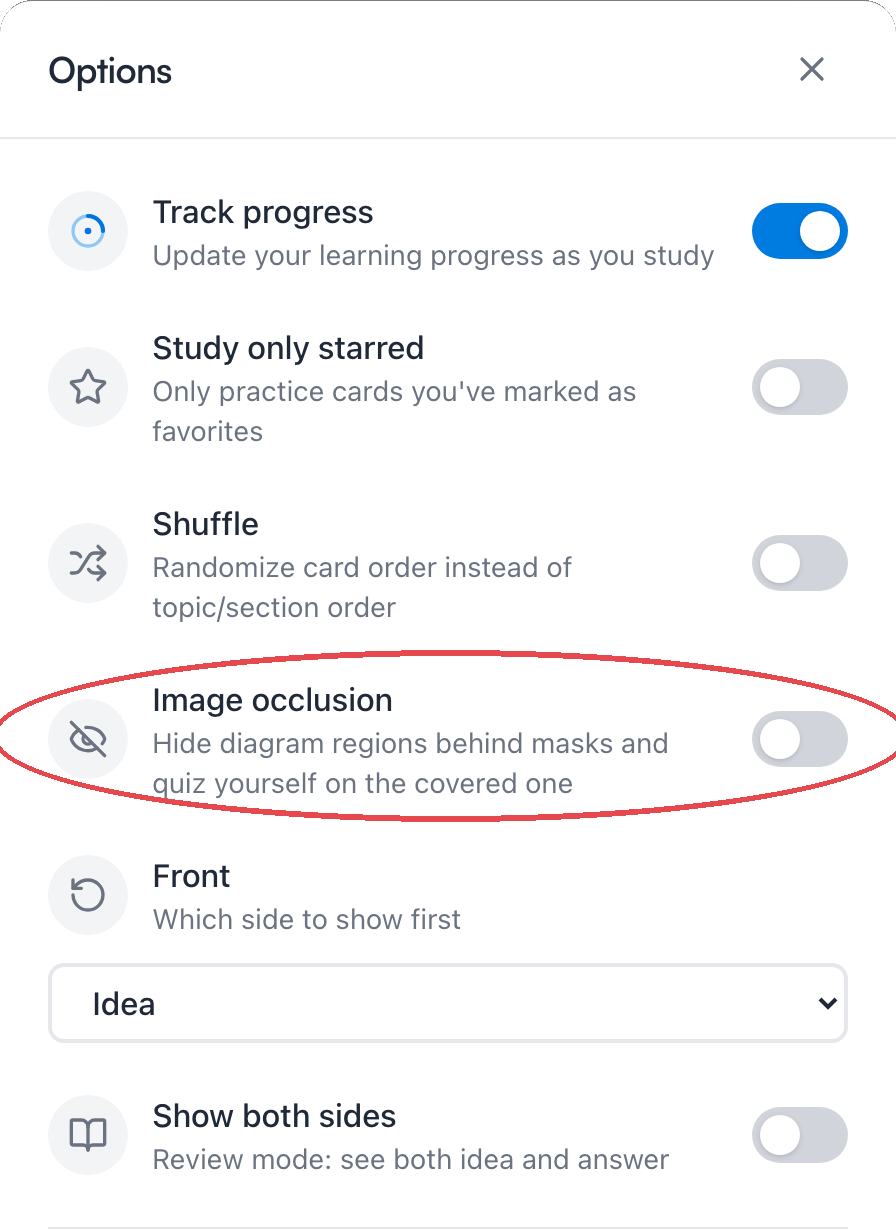
Now every hotspot is covered by an opaque mask, and each question asks what's under the highlighted one — neighboring labels can't give anything away:
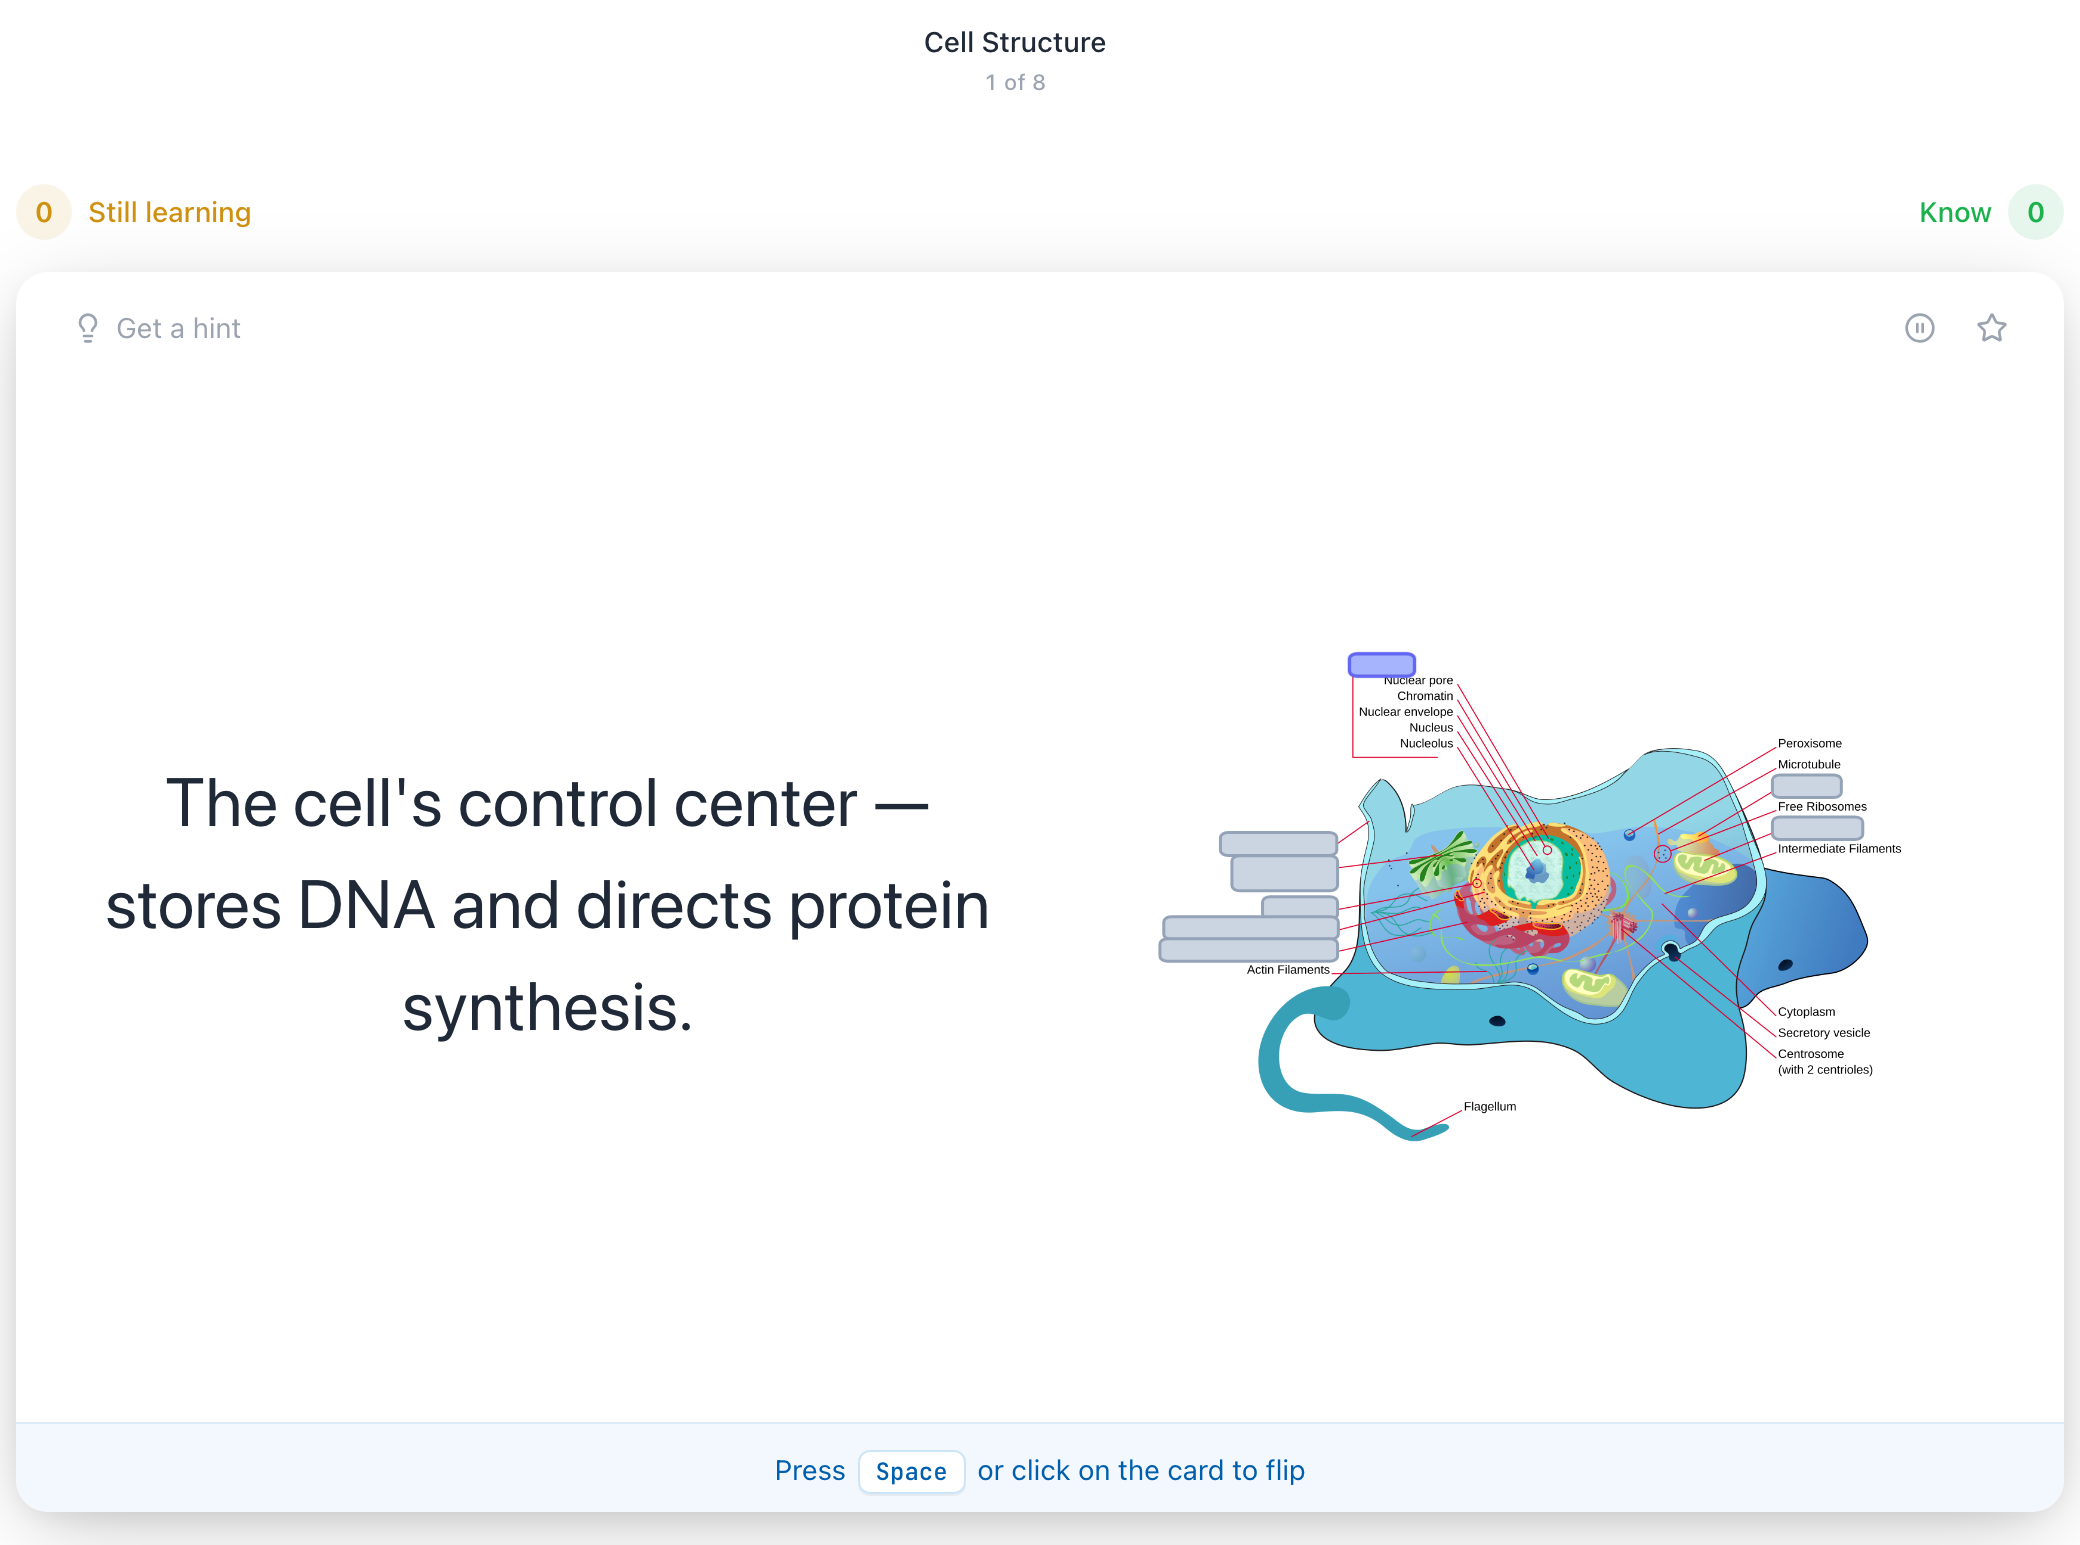
Answering lifts only that mask. The cards you haven't been asked about yet stay covered, so a session never spoils its own later questions:
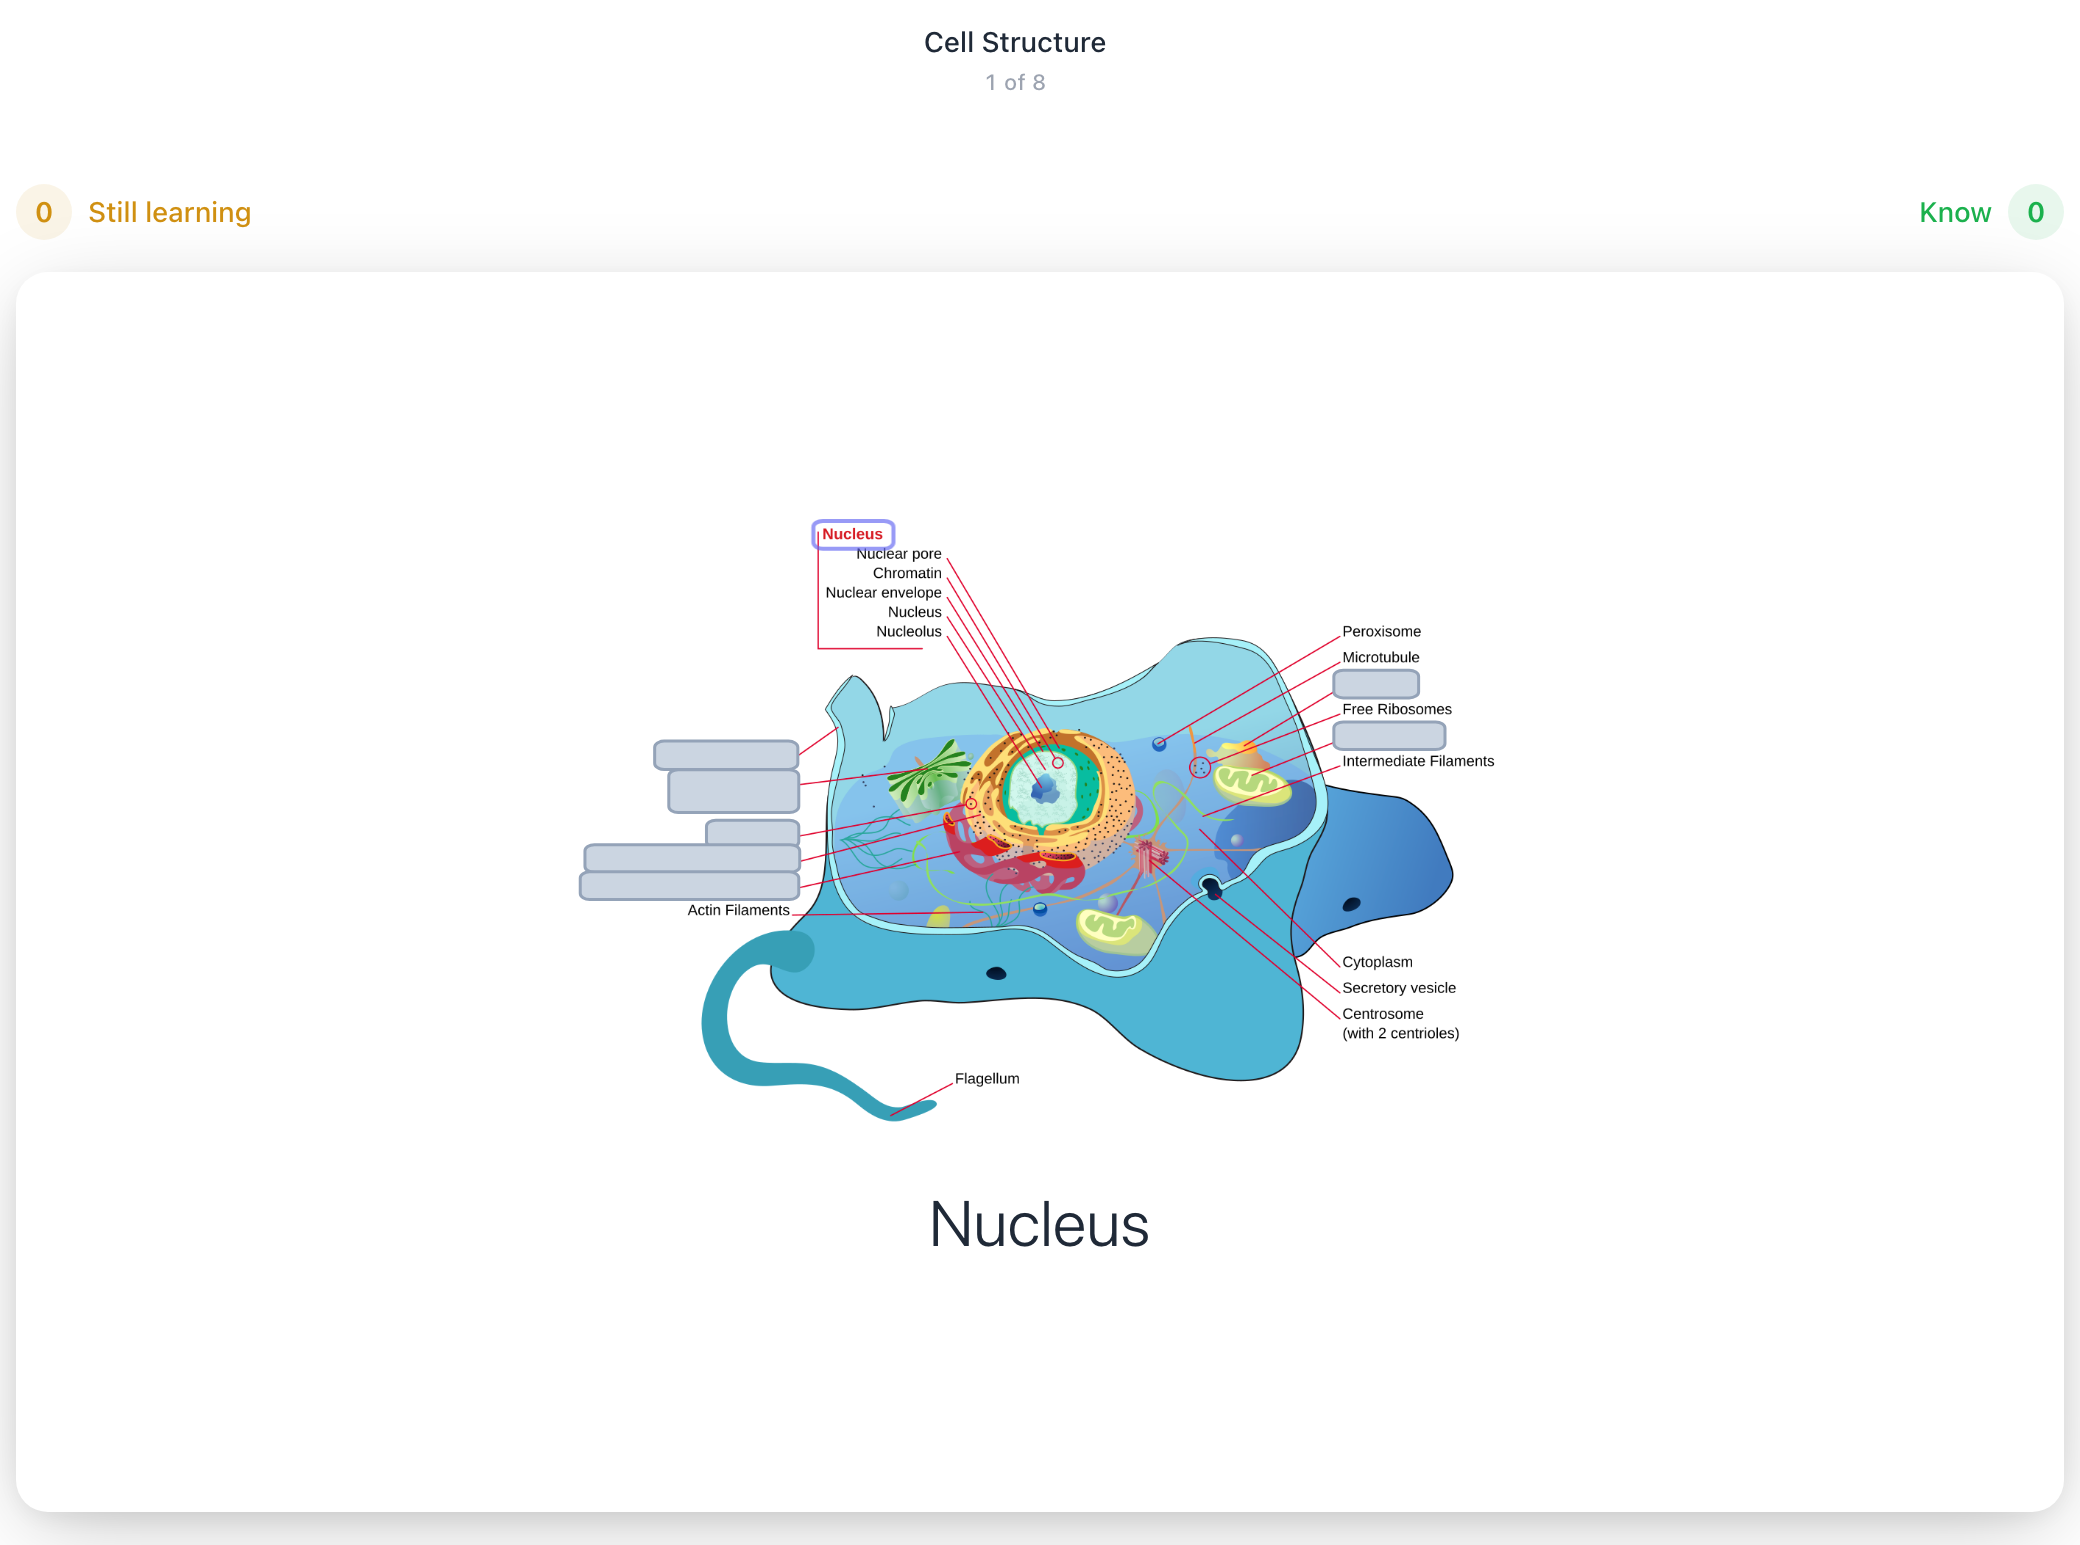
Any card can also show you where it lives: look for View location in image map on the card.
Sharing a map
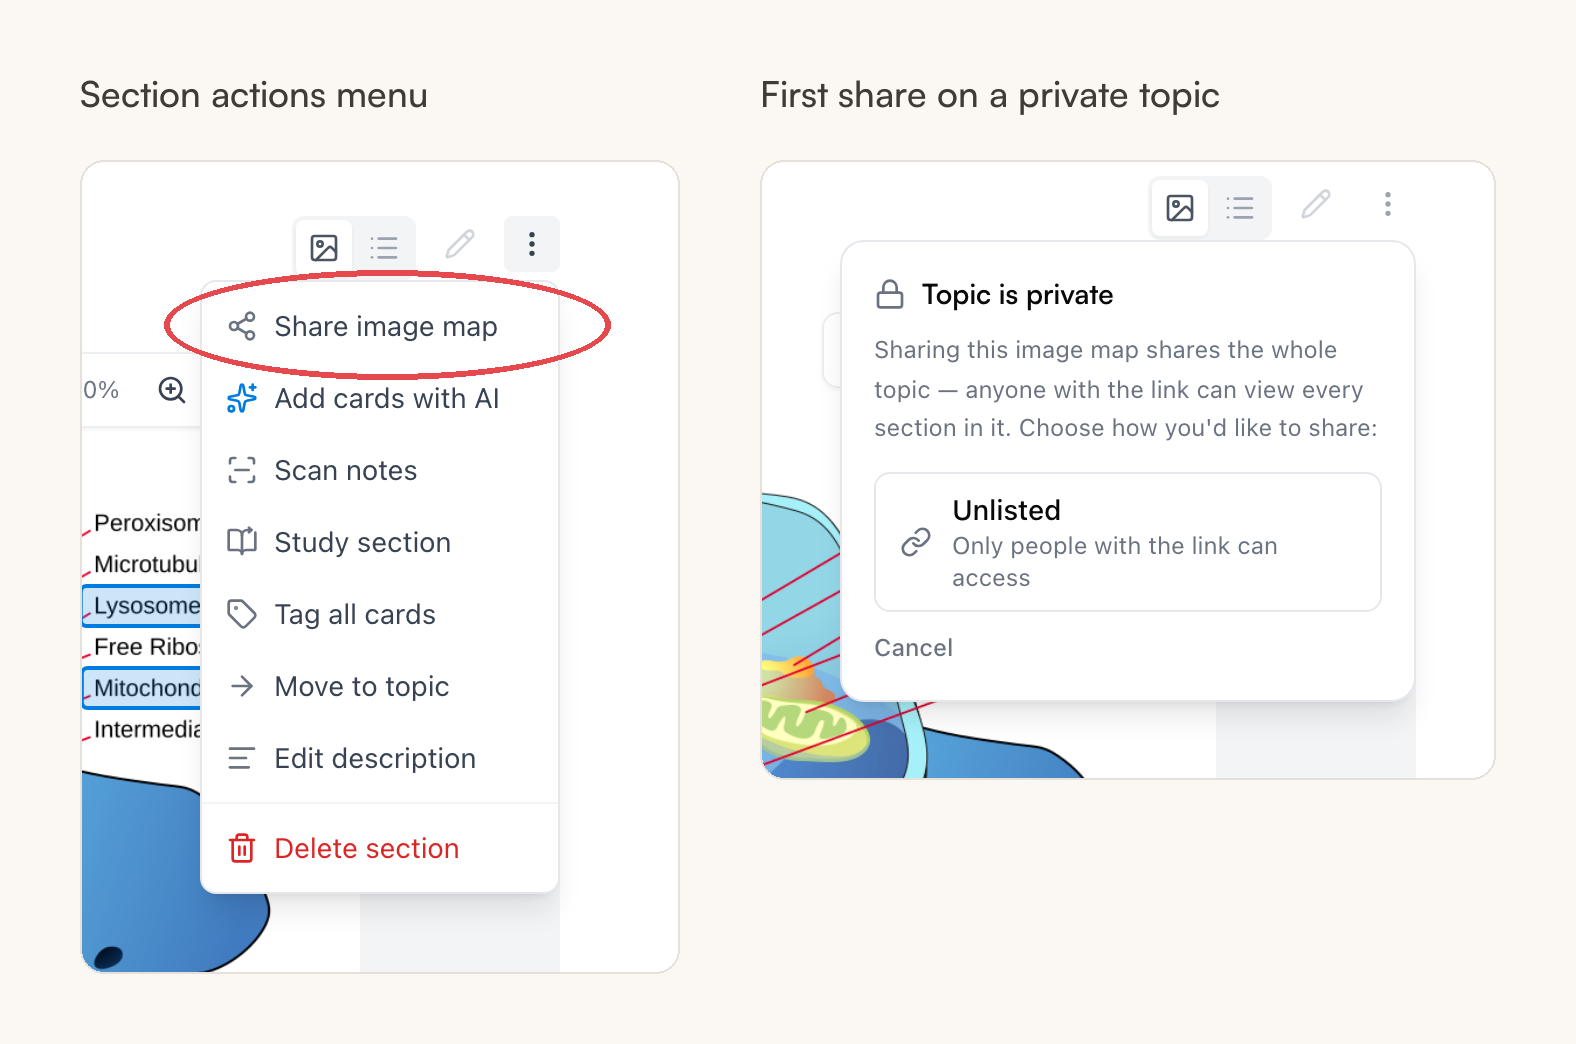
The section's ⋯ menu has Share image map at the top, which gives the map a standalone page and copies its link. One heads-up before you use it: sharing an image map shares its whole topic — anyone with the link can view every section in it — and on a private topic a dialog says exactly that before creating an unlisted link, which only people who have it can open.
Anyone who opens the link sees the map on its own page — no account needed — with the same viewer you have: zoom, labels on hover, fullscreen, and practice mode, so a friend can quiz themselves on your diagram too. The share link is also one click away in the viewer toolbar (Copy share link).
Common questions
Is this the same as image occlusion in Anki or RemNote? Same idea, less setup. Anki needs an add-on and a manual masking pass; in Mento the masks are your hotspots, so any map you build (or auto-detect) works with occlusion immediately — flip one toggle in a study session, or use practice mode for a no-setup version right on the page.
What images work best? Diagrams with printed labels — the kind in a textbook or lecture slide. AI detection anchors hotspots to the label text, which is exactly what practice mode and occlusion then cover up. Unlabeled images work fine too; you just place and name the hotspots yourself.
Can I attach a hotspot to a card I already have? No — every hotspot creates its own card. If you have existing cards about the diagram, they can live in the same section, but they'll only show in List view.
Does an image map cost anything? Image maps are free on every plan. Only Auto-detect hotspots and the AI card-generation paths use AI actions from your budget — creating maps and drawing hotspots by hand never does.
Up next
How to study in Mento
What the Study button actually does — daily practice, streaks, due reviews, the study modes, focusing on weak spots, and getting ready for an exam.
Didn't find it?
The FAQ answers the questions we get most, and every way to reach us is on the contact page.